Saturday, November 20, 2010

Gutter Shots

Or maybe I could have called this post "Curb Appeal", or "Street View". Or, maybe even, "In the Eye of the Beholder".

OK, so what on earth am I talking about? Well, first off, take a look at these first two shots. Click on them if you'd like to see them a litter bigger ...


You probably know by now that I like to take photos of sunsets. So, no matter where I am when the sun is going down, I just have to take a look and see what is happening in the sky. A couple of weeks ago, I went to a friends house in Mesa to look at his old car to see if my daughter would like to have it. This was after work, and of course, that means that it is getting near to sun down. After we looked at the car and drove it around the block a couple of times, I noticed as I looked down his street, that the sky was starting to do nice things.

But, here we were in the middle of the city with no clear view of the horizon. What's a sunset picture without the horizon?!?! And, no cactus either. Oh well, I grabbed my camera and took a couple of steps down the street, thinking that maybe I could capture a few cars in the shot and make them look interesting. Of course, that shot wasn't any good at all. But, then I noticed a little bit of water in the gutter. Yes, I said, in the gutter!

My friend had gone in the house to get something, and when he came back out he found me lying in the street with my head and camera in the gutter. He really thought that I had lost my marbles. (Maybe he was right?) Any way, I like the above results -- don't you?

Now, here is the question, do these shots really look like I took them in the gutter? I know that you are probably saying NO!!!

I have to admit that these shots have been doctored up a little. So, to show you what I started with, here are the original, unedited versions ...


If you compare these two with the first two, you can see that I increased the color saturation a little bit, increased the contrast a little bit to make the cars and other things disappear, and intentionally deleted some things like street lights, cars, and (in the second of the two images) that tall, skinny trunk of a palm tree.

OK, maybe it still doesn't look like I took this shot while lying in the street with my head in the gutter, so here is the first of the two images, with everything lightened up a bit so you can see more of the detail ...


In this version of the shot, you can recognize the curb at the left of the frame, and tell that my head and camera are actually below the top of the curb. I got the camera as near to the water as I could without getting wet. Especially, not the camera!! Also notice the cars and street signs that I got rid of in the versions at the top of this post.

So, I guess that beauty is where you see it!!

Monday, October 25, 2010

Trying to be Artistic! Or, Fun with Dandelions!

Remember now, I am an engineer at heart. I have been an engineer all my life. Basically engineers only see the tiny details, the "how to" of the way things work. To actually see and appreciate the beauty that God creates and places all around us, typically goes beyond the scope of an engineer. Now, to take a step even beyond simple recognition and appreciation of beauty, is to create something of beauty.

OK, I'm really not belittling myself and all my engineer friends by implying that we can't be artistic. But, I do find it to be the general rule. So, when it comes to this photography stuff, I find it amazing that I am so enamored. Several decades back, when I first got started in photography, I got myself a nice 35mm SLR. You do remember film, don't you? In the beginning, I took a lot of pictures. Most of the family shots turned out OK. Landscape shots were a bit harder. Plus, in those days, you had to put a roll of film in the camera, proceed to shoot it all up, and take it out of the camera and take it to the store for processing so you could pay for a box of slides or a bunch of prints. The whole process took a lot of time and cost (what at the time seemed like) a small fortune. And, then you would find out that not too many of the shots turned out very good. And as for the better ones, by the time you got the prints back, you forgot how you took the shot, what setting you had used, etc. Needless to say, over the course of a few years, the excitement wore off.

So, here we are several (!!) decades later, and I've finally gotten into digital photography. Instant results! Low cost! Throw the bad shots away right away! Recognize the good shots in a timely enough manner that you can remember what you did, so that you can learn from the mistakes and successes of tonight's shooting, and apply new knowledge to tomorrow's shots. Whew, thank goodness! So, the excitement is back.

Not to mention the fact that I'm (personally, at least) wowed by the results of the sunset shots that I have managed to take. I will always say, however, that it is God that puts the beauty in the sky. But, somehow, He is allowing me to learn how to capture that beauty on film. (Well, OK, not on film actually, but on, what, a digital sensor? That sounds so awkward to say!) But, I think about all the beautiful photographs that other people take of landscapes and nature (again, capturing God's creation), and I find that I want to expand my horizons beyond the setting sun, as it were.

So, about a month ago, I went again to the Men's Retreat that my church group puts on every year. We are very fortunate to be able to enjoy a beautiful ranch setting in the high pine forests of Eastern Arizona about 6 hours ride from our central Arizona homes. The ranch is located only about 10 miles from the New Mexico border at an elevation of about 9000 feet.
Now, central Arizona (where us guys live), consists of the bleak, dry, brown, barren deserts. See the shot of the Superstition Mountains below...
Well, OK, maybe sometimes the desert isn't all that brown and yucky. But, none the less, there is a great difference between the desert and the pines in the mountains.

As opposed to the barren landscape here in the desert, the ranch is green, luscious and gorgeous. Immediately, I want to capture the greatness of the area on film (???) for sharing with those back home. Mind you, that even though I find sunsets rather easy to photograph, I find regular landscapes rather difficult. How to compose a shot? What setting to use? Should I use a polarizing filter, etc?

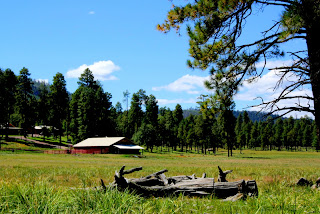
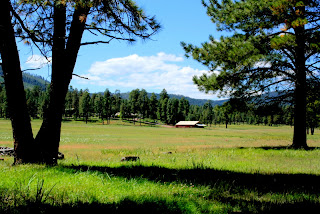
Without knowing what works and what doesn't, I head off around the ranch (110 acres) with cameras in tow. Every year at the retreat, I spend some time alone just walking around the property, communing with nature and talking with God. As I went along, I tried to spend some time evaluating what might comprise a nice photo. Below are a few shots that turned out OK. But, to make them look nice, with good contrast and color saturation, they all required some editing on my computer.

I tried to capture reflections.

I toyed with some of the wildflowers.

Some of the flowers exhibited wildlife, too!

I had a lot of fun with the dandelions.


And I tried to take photos of the landscape.

Oops, more dandelions.

Eventually, the day began to come to an end. As you can see, my shadow is growing rather long as the sun approaches the horizon behind me.
 
Off to the West, the sun is going down behind the trees.

As you can see below, the pasture and the trees are now in the shade, but the sun is still shining on the clouds. This shot is looking South East, away from the setting sun.

Looking back to the West again. Oops, looks like another dandelion wants to get in the shot.

Well, no wonder. Looking back to the East, you can see that the dandelions are all over the place!

Eventually the sun did go down below the horizon, yielding the next three shots. Yep, those are dandelions in the first shot.


The sunset was nice. But, I've noticed every year, that being up in the mountains where the air is fresh and clean, just doesn't produce as spectacular a sunset as does the dusty, dirty air that we have down in the desert.

Anyway, this final shot is us guys. That's me, at the far right with the hat on. I put my camera on a tripod, set the timer, and ran to get in the picture along with the rest of the guys. I've taken photos at the retreats every year, including a final group photo each year, but, usually I end up being the one guy that's not in the picture.


This year, several of the shots turned out OK, at least after some editing. I think that overall they were better than the shots I took last year. But, having said that, with a lot of the shots I'm still not too happy with the composition. And, I still haven't learned which setting on the camera to use to get the best results. And, when should I use a filter on the front of the lens, and when should I not? So much to learn!!!


So, the bottom line is -- learn by doing.

I hope you didn't mind this trip away from the normal sunset stuff.

Tuesday, September 7, 2010

Lightning Strikes!

Bad! I've been very bad! Well, OK. Maybe not really 'bad' -- just BUSY! I do think regularly about creating new posts, but everything else seems to get in the way. When I look at the date of my last post, I get all embarrassed!

Some of the most fun photos to take are of lightning. I like to joke with folks about how hard it is to capture lightning. You know, wait, see the flash, press the shutter button. Darn! Missed again! It brings on a chuckle. Obviously, there must some other way to do this. And so there is -- long exposures!

But, there can be a problem with that approach, too. There are three factors that add together to create the proper exposure of a photograph; film (or sensor) sensitivity, shutter speed, and aperture. The sensitivity is the ISO value, such as 100. As the numbers double, the sensitivity increases by a factor of two. But, there is a down side to using larger ISO values, and that is increased graininess of the image. Newer cameras are getting better about this all the time, but it will always be an issue. The shutter speed is the length of time that the shutter remains open allowing light to reach the sensor. This is given as a number of seconds, or as a fraction of a second, such as 1/125 of a second. The longer the shutter is open, the more light will reach the sensor. And, finally, there is aperture. In essence, this is a number that is representative of the diameter of the opening in the lens through which light is admitted to the sensor. This value is usually specified as the letter 'f' divided by a number, such as "f/1.4" or "f/5.6". In technical terms, the aperture number (or f-stop number) is calculated as the focal length of the lens divided by the diameter of the opening. But, don't get bogged down by that. Here is the important thing to remember, every time the aperture value increases by an additional multiple of 1.4, the amount of light that reaches the sensor will be cut in half. Or, to make it even simpler yet, the larger the f-stop number is, such as 5.6 vs. 1.4, the smaller the diameter of the opening, and the less light that makes it to the sensor.

So, here is the deal, to take a picture with a longer exposure time, and yet maintain a correct exposure, requires that you either decrease the sensitivity of the sensor (set for a lower ISO value), and/or shoot through a smaller diameter lens opening (larger f-stop number). Sounds easy, huh?

That's what I thought too. But, recently I learned something. And that is that it is much harder to take lightning shots during the day than it is at night. Why is that, do you suppose? Well, here is what I have figured out. Let's see if I can explain it clearly enough.

First off, I always try to shoot at the lowest ISO value I can get away with, so as to avoid grainy pictures. This means that I stay at ISO-100 as long as I can. Yes, there are reasons to increase the ISO value, but for now, let's just stick with 100. So, that just leaves altering the aperture and shutter speed.

It may seem that the easiest thing to do to capture lightning shots would be to shoot with a very slow shutter speed. My camera allows me to go to as long of an exposure as 30 seconds. Beyond that, I can put the camera into its bulb setting, and, using a remote trigger device, can shoot exposures as long as I like. Such as when I have taken some star photos with exposures as long as 15 minutes. OK, so what's the problem? Well, technically, it has to do with the mathematical integration of all that light energy. But, let's see if we can make that a little easier to understand.

Let's pick an example of wanting to shoot with a shutter time of 30 seconds. Of course, to compensate for that, you'd have to shoot with an smaller aperture (i.e., a larger f-stop number) such as f/22. The exposure will be a function of the total amount of light that hits the sensor. During the brighter hours of the day, to shoot a 30 second exposure would require a really small aperture so as to not over expose the image. The brief little lightning flash, when compared to the overall brightness of the sky/clouds, is so insignificant that it just disappears, and doesn't show up at all in the image. Wow, all that time taking that picture, and the lightning did flash while the shutter was open, but, darn, nothing shows up!?!? Yup.

During the darker hours of the evening or night, you will be able to shoot at a much larger aperture. And, the integration (or collection, or summation) of all that light energy will still produce a correct exposure. But, the amount of light energy that came from the lightning flash, will be a much larger percentage of the total light energy collected from the dark sky, and so it will show up much better in the picture. Whew! I hope that makes some kind of sense! Trust me, it's easier to think through than it is to try and explain it!

So, here are a few shots from a few nights ago. I was very lucky on this particular night, because usually when I try to capture lightning, I may take a dozen or so shots but only come away with a single shot actually containing a strike. I think I got about a half-dozen strikes on this night. Following are the best four.

This first shot came first, while it was still a little lighter out. Note that the exposure was only 8 seconds at F/22. The shorter exposer makes it harder to catch a flash, because you are just guessing when a strike may occur, and triggering the shutter ahead of time. I got lucky in this one a captured a fairly decent strike.

ISO-100, 8-seconds, F/22
In the next shots, note that I've been able to increase the exposure time to 30 seconds, making it easier to capture a strike. Because it has gotten a little later in the evening and has gotten somewhat darker, I've been able to open the aperture to f/18. Note also that the longer exposure time makes the moving clouds streak and blur. That's an effect I rather like.
ISO-100, 30 seconds, F/18

ISO-100, 30 seconds, F/18

ISO-100, 30 seconds, F/18
I'll try to not be so long at getting back to make my next post. Till then, God Bless!!!

Sunday, May 30, 2010

Is It Really Cheating?

I've had talks with my friends ever since I started shooting sunset photos a couple of years back, and sharing them with my friends. One of the comments I have heard a quite a few times is that I could 'PhotoShop' (note the use of the name 'PhotoShop' as a verb instead of a noun, much the same way that 'google' is frequently used as a verb!) some of my pictures to get rid of power poles, etc. Earlier on, I felt like I didn't want to spend any time learning how to edit pictures in such fine detail. Plus, I felt like it was cheating. You know, make the image look like something that it's not.

As time has rushed by, I find that I like to edit my pictures more and more. Usually all it takes is a little contrast adjustment to turn a so-so picture into a real keeper. I've written about this in the past. I find that I use Picasa for most of my editing since it is so simple, and doesn't require a large learning curve. One of the special editing features of Picasa that I have talked about in detail here in the past, is called Graduated Tint, and can be found on the Effects tab.

This time, I'd like to discuss another special editing feature of Picasa that you can find on the Basic Fixes tab, and is called Retouch. Take a look at the following picture. Go ahead and click on it to get a larger view. I really like this picture. The colors are great, and the silhouettes of the plants in front of the water are nice. I hope you will notice the major annoyance that bugs me -- those wonderful street light poles.


Now, take a closer look at this next picture. I increased the contrast a small amount which makes the plant silhouettes show up a little bit better. But, do you notice what is missing? Where did those street lights go? Enter the Retouch tool!


Here is another sample, taken from a slightly different angle. I think that I like this shot even more than the one above. But, there are those wonderful street lights again! Yuck!


So, once again, enter the Retouch tool! Yeah!


I really, really like this modified image. But, the question that I want to ask is - "Is this cheating?" If the idea is to capture the true environment, then I guess that the answer would be yes. But, if the idea is to make a pretty picture, hopefully one that someone would like to look at, and if art can be considered as part of the process of creating the image, then maybe it's OK.

What do you think?

And, since I didn't go into any detail here as to how to use this Picasa tool, let me know if you would like more details. The instructions included in Picasa are a little bit skimpy. I know that I don't have it totally figured out yet, but the more I use this tool, the more I understand. Seems like that's the way it usually goes, huh?

Wednesday, January 27, 2010

An Experiment With a W-I-D-E View

I have no idea where the time goes. Busy, busy, busy - right? Probably you too, huh? It's been a long time since I last created a new post. Sigh!! Oh well, here's one that I've had partially finished for a long time.

On several occasions, I've looked at the scenery that surrounds me, and wished that I could capture "the whole thing." I remember reading, a long time ago in my past, about cylindrical cameras consisting of a sheet of film positioned inside a cylinder, and a slot in the side of the cylinder to let the light in. The cylinder was held in a vertical position, and rotated, which would allow for a 360 degree picture to be taken. But, much more recently, I've read about software that will take a collection of individual digital photos and stitch them together into a single 'huge' picture. So, on a couple of occasions, I've stood in a fixed place, and taken a collection of individual photos, moving carefully from my left to my right, being careful to make sure that each new photo overlaped some of the scenery from the previous. I also tried to keep the distant horizon vertically poistioned at a uniform place within my view finder.

So, I wanted to show you an experiment that turned out pretty good. To put this together, I used the Autostitch program, which I downloaded from www.autostitch.net. (If you go to this address, note that you will be redirected to another address.) Click on Download the FREE demo version (Windows) now!.

On this particular evening, we experienced a very lovely sunset -- one of those that seems to wrap all around you. I stopped by the side of the road on the way home, and jumped out of my car with my camera. I started oohing and aahing at what was developing, and started taking pictures. After noticing that the 'show' was wrapping itself all around me, I decided to see if I could capture enough shots to put together the panorama.

The following 8 photos are a progression from left to right. Each of the original photos is 3264 pixels wide by 2448 pixels high. When I upload those photos to this blog, I have to reduce them in size to 800 wide by 600 high. However, when I configured Autostitch to process these photos, I told Autostitch that I wanted the 'output' file to be 2400 pixels high. I wanted to be able to pan the panoramic picture left and right, and see the entire 360 degrees that I saw when I was standing there taking these photos. I didn't want to loose any resolution. After running these 8 photos through Autostitch, the output file ended up being 14,026 pixels wide by 2,400 pixels high.


Note that each of these has been uploaded as 800 by 600. But, because the resulting panoramic picture is so large, I uploaded the final picture as 1600 by 274.

1

2

3

4

5

6

7

8

I wish that I could upload the entire output picture in all its splendor. But, I can't. Anyway, make sure to click on the picture below to see it in a larger form.


All in all, I am very pleased with the results. I don't know if I will do this very often, but it is a very good tool to have under your belt when the scenery demands it.